
What is Slide out Follower Button?
If you're looking to increase your followers, then this slide out follow button will provide you a great opportunity to convert your visitors into followers. This follower button sticks to the bottom right side of your screen, allowing your visitors to easily subscribe to your blog for updates.
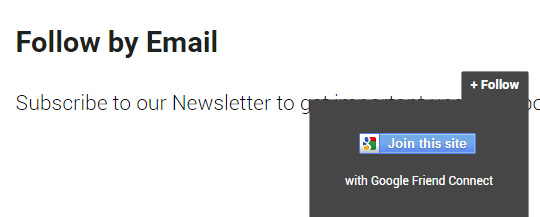
Since, because of the slide out feature this widget doesn't takes a lot of space on your screen. Therefore, it does not compromise on user friendly experience nor it interrupts a user while he is browsing or ready your content.
You can check the demo of this widget here.
Add Slide out Follow button Widget in Blogger:
To add a Google friend's connect follow button in blogger please follow the below instructions correctly:
The very first thing you need to do is to add the CSS codes. Go to Blogger >> Template >> Edit HTML >> Search for ]]></b:skin> tag and just above it paste the following code. You can also customize the below codes to match your style of template color scheme:
#arlinafollowSubscribe {
background-color: #464646;
width: 220px;
color: #fff;
position: fixed;
z-index: 999;
right: 10px;
bottom: 0
}
.arlinafollowButton {
background: #464646;
color: #fff;
font-size: 13px;
line-height: 28px;
padding: 0 10px;
text-decoration: none;
position: absolute;
top: -28px;
right: 0;
display: block;
border-radius: 2px 2px 0 0;
height: 28px;
font-weight: 700
}
.arlinafollowButton span {
background: url("https://blogger.googleusercontent.com/img/b/R29vZ2xl/AVvXsEjkSrP1sa6wuOBIc767vm9MZODKvz5ckmQvaCE8ktzOYoEzxkkxWJG7wMy_xwZTTez7qrcrgAmzfkAzUb3NWHQkMVK-69mnLCI874o0tR5vMvTr4_j0Qqww34JsqYZ0o7n6LjKrfM-4Yp5O/s1600/follow-blogger.png") no-repeat scroll 0 3px transparent;
padding-left: 15px
}
.arlinafollowButton:hover,
.arlinafollowButton:focus,
.followActive,
.followActive:hover {
color: #fff
}
.arlinafollowButton:hover span,
.followActive span {
background-position: 0 -37px!important
}
.followactive {
background-color: #333
}
.arlinafollowForm {
padding: 15px;
margin: auto;
text-align: center;
font-size: 12px
}
.arlinafollowForm p {
margin: 10px 0
}
.arlinaFollowFooter {
text-align: center;
font-size: 11px;
padding: 7px 0;
margin: 0 0 -15px;
border-top: 1px solid #3c3c3c
}
.arlinaFollowFooter a {
color: #aaa;
background: none;
text-decoration: none
}
.arlinaFollowFooter a:hover {
color: #fff;
background: none
}
Again in the template, search for </head> and just above it paste the following jQuery code:
<script type="text/javascript">
/*<![CDATA[*/
!function(e){e(document).ready(function(){e.extend(e.easing,{easeOutCubic:function(e,o,t,a,n){return a*((o=o/n-1)*o*o+1)+t}});var o=e("#arlinafollowSubscribe"),t="-"+o.outerHeight()+"px";o.hide().css({bottom:"-510px"}),setTimeout(function(){o.show().animate({bottom:t})},500),e(".arlinafollowButton").click(function(a){o.hasClass("followOpened")?(e(this).removeClass("followActive"),o.removeClass("followOpened").stop().animate({bottom:t},{duration:300,easing:"easeOutCubic"})):(e(this).addClass("followActive"),o.addClass("followOpened").stop().animate({bottom:"0"},{duration:500,easing:"easeOutCubic"})),a.preventDefault()})})}(jQuery);
/*]]>*/
</script>
Once everything is done, press Save Template button present at the very top of your screen.
Now to make the widget appear on your blog, you have to also add the HTML Codes of this widget. Go to Blogger >> Layout >> Add a Gadget >> Add HTML/JavaScript and paste the following code in the HTML box.
<div id="arlinafollowSubscribe" style="bottom: -971px;">
<div class="arlinafollowForm">
<a class="arlinafollowButton" href="#" title="Follow"><b>+ Follow</b></a>
<br />
<a href="http://www.Blogger.com/follow-blog.g?blogID=7342017194742683056" title="join this site" onclick="window.open(this.href, 'dmfollow', 'toolbar=0,location=0,statusbar=1,menubar=0,scrollbars=no,width=599,height=521');return false;" style="text-align:center;font-weight:bold;text-decoration:none;"><img src="https://blogger.googleusercontent.com/img/b/R29vZ2xl/AVvXsEhHXuJaY_0njTduIfDDuYa9IaMN_wxkvFjPbnPH9cm1FA-DAF2mZWKMFhCgtiZvteZDNOIAsBwlsUA4zNEQA68LdmJCiRSojs6wDUTbah6L1iQ1ORKYFQnGJrVMicLz1XHSI1hAmy9qRCzW/s1600/Follower.png" alt="Join on this site" /></a>
<br />
<p>with Google Friend Connect</p>
</div>
</div>
After pasting the above code in the text box, you need to replace the blogID i.e. 7342017194742683056 with your blog's ID. You can see this tutorial on how to find your Blog ID in Blogger. After replacing the blog ID, save the widget by pressing Save widget button.
We hope this tutorial has helped you in learning how to add slide out Google friend's connect follow button in blogger. If you like this widget, feel free to share it on Facebook, Google+ or Twitter.
The Editorial Team of MyBloggerLab consists of a group of Professional Blogger geeks Led by Syed Faizan Ali (Founder of MyBloggerLab).


Post a Comment
We’re eager to see your comment. However, Please Keep in mind that all comments are moderated manually by our human reviewers according to our comment policy, and all the links are nofollow. Using Keywords in the name field area is forbidden. Let’s enjoy a personal and evocative conversation.