
You can sell almost anything on your Blogger site, but the product you are selling must be related to your blog. If you write about technology on your blog, then you can sell any kind of tech gadgets on your blog. If you have written an e-book, then you can make that e-book available though your eCommerce enabled blog. Blogger can also sell T-shirts, jewelry, skin products and almost anything that is legal to sell.
You can check the demo of Blogger eCommerce Store here
How to Create a Online eCommerce Store in Blogger:
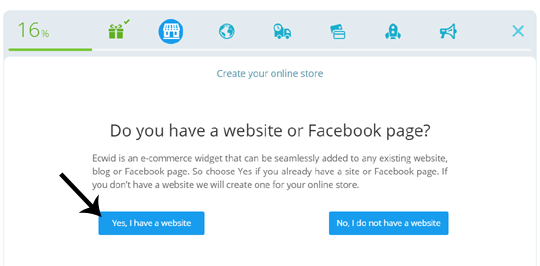
To add an online store in Blogger, we will be using a plugin called ECWID. It is a FREE eCommerce Shopping cart and store solution that helps you to convert your existing blog into a fully functional eCommerce store.Firstly, you need to register a account at ECWID.com. If you have a PayPal, Facebook or Google account then you can opt for these services to register quickly.

Step#1: Adding a Product
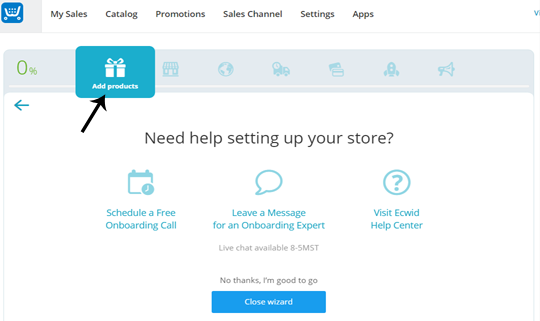
After registering an account, you will be able to access Ecwid Control Panel or Product dashboard from where you can create your first product. Select "Add a Product" button from the top menu and proceed to the next step.
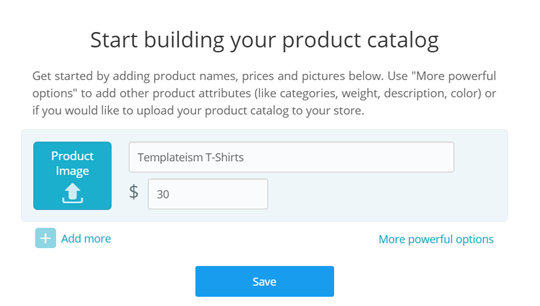
Add product names, prices and pictures. You can use "More powerful options" to add more details to your product like category, description, color and etc (Adding more details to our products will be handy because we will later upload our product catalog to our blog). After adding your product, press "Save".
You will not see a message that your product is added successfully, simply click on "Proceed to next step" button.

Step#2: Creating a Store:
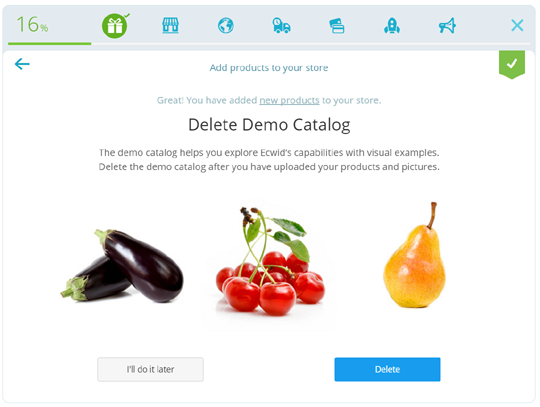
After deleting the demo catalog, it is time to publish your product on your Blogger site. Simply select "Create Store" from the top menu as shown in the image below: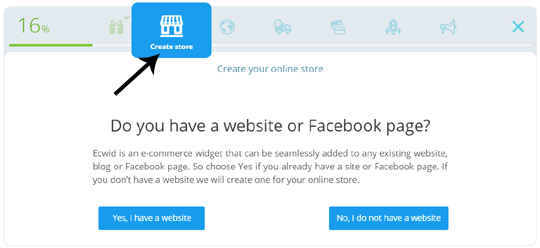
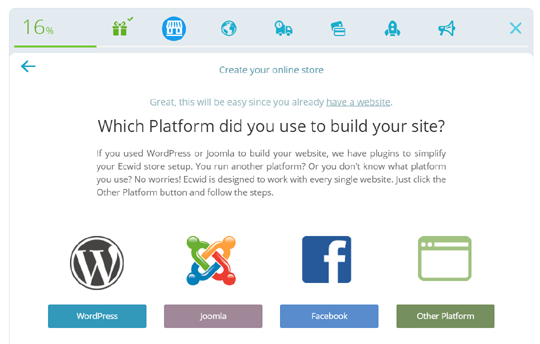
Now you need to choose the platform which you used to built your site, since we are using Blogger and it is not listed in the available platforms. We will select "Other Platform".
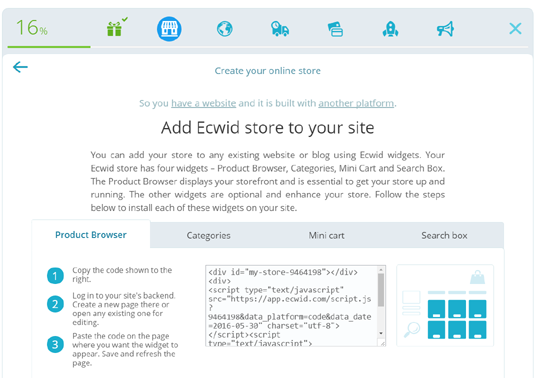
Ecwid provides four different eCommerce widgets that can be added to your Blogger store - Product Browser, Categories, Mini Cart and Search Box. We have defined each category briefly below;
- Product Manager: It displays the complete range of the products that you have added in product catalog and this widget is extremely essential to get your store up and running while other widgets are just optional to have.
- Categories: This widget will display a complete list of categories of your store.
- Mini Cart: It will add a mini shopping cart to your site. Adding it in menu will assist users in checkouts.
- Search Box: It will help users in searching different products on your store.
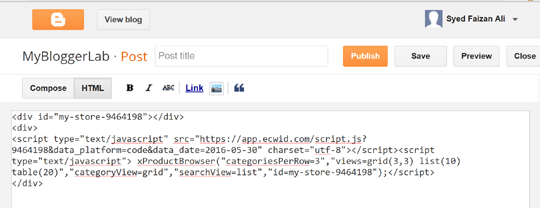
Now you will be able to see embed codes of four different widgets that are listed above. Copy any of these codes and Paste the code on the page where you want the widget to appear. Save and refresh the page.
That's it, now you can add more products to your store. Any product added to the product catalog would appear automatically in the product browser in your blog.
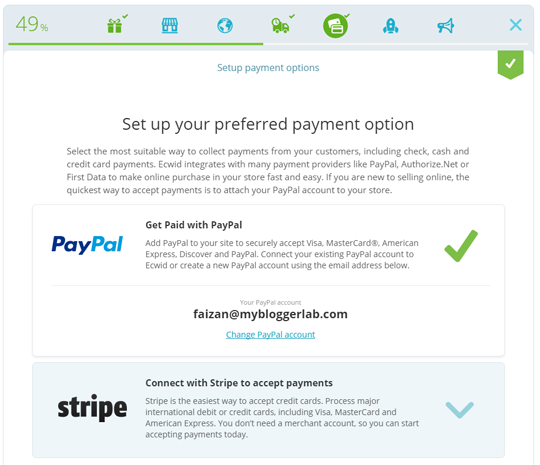
Step #3: Setup Payment Method:
Ecwid also supports popular payment platforms like PayPal,Authorize.Net and Stripe. You can select the most suitable way of collecting payments from your customers which includes checks, cash, credi card payments.
Select "Get Paid" from the top menu.

If you want to use PayPal to collect payments from your customers in blogger then select "Get Paid with PayPal" and enter your valid PayPal email Address. Similarly, You can also use Stripe, if you have a stripe account.
You can now setup shipping methods by selecting "Configure Shipping" from the top menu. If you sell digital goods then you can simply disable shipping for products. If you sell physical products, then you can simply follow the instructions to setup the shipping methods.
We hope this tutorial have helped you in learning how to create a online eCommerce Store in Blogger blog. If you like this article, share it with your friends on Facebook, Twitter or Google+.
The Editorial Team of MyBloggerLab consists of a group of Professional Blogger geeks Led by Syed Faizan Ali (Founder of MyBloggerLab).


4 comments
can you please provide a demo... so that I can see, how it looks like..
Hi Tahir,
The Demo is already at the begging of this article.
However, in case you missed it.
Here's the demo link:
http://milanotheme.blogspot.com/p/shopping-store-demo.html
Hello
Thanks for This posted.
Pls i just create A blogger blog following your tutorials. How ever i want to dropship with A wholesale company on my blog. They have provided me with A Data feed CSV for AT containing All the product, price, pictures,and their catrgories and more. But i dont kno how to install it on my blog. Also they provided me with an API of which i dont kno how to install it on my blogger blog. Pls can you help me out on how i can do it. Or can i install the CSV file and API into This Ecwid and product section and will it work. Thanks for your help in advance
I am facing this type of problem
When payment process takes up this ecwid portal show error like this
This recipient is currently unable to receive money.
Your purchase couldn't be completed
There's a problem with the merchant's PayPal account. Please try again later.
Please fix out my problem
Post a Comment
We’re eager to see your comment. However, Please Keep in mind that all comments are moderated manually by our human reviewers according to our comment policy, and all the links are nofollow. Using Keywords in the name field area is forbidden. Let’s enjoy a personal and evocative conversation.