

XML Sitemaps vs HTML Sitemaps
An XML created with the help of an XML markup language and are especially intended for search engines. You can create and submit your site's XML sitemap in webmaster tools, which will not only improve your site's crawling rate but also quick indexation of your site.
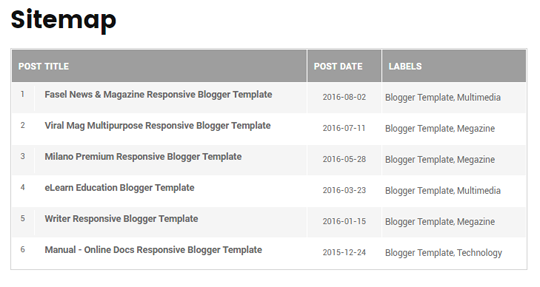
On the other hand, HTML sitemaps are created with plain Hyperlink Text Markup Language and are especially intended for your website visitors. It is usually used to list all the post or pages that are published on your site.
You can check the demo of this widget here.
You can check the demo of this widget here.
Adding an HTML Sitemap With All Posts in Blogger:
To add a HTML sitemap in blogger please follow the below instructions correctly:
- The very first thing you need to do is to add the CSS codes so you can make your sitemap look attractive. Go to Blogger >> Template >> Edit HTML >> Search for ]]></b:skin> tag and just above it paste the following code. You can also customize the below codes to match your style of template color scheme:
/* Sitemap plugin By MyBloggerLab */
#bp_toc {
color: #666;
margin: 0 auto;
padding: 0;
border: 1px solid #d2d2d2;
float: left;
width: 100%;
}
span.toc-note {
display: none;
}
#bp_toc tr:nth-child(2n) {
background: #f5f5f5;
}
td.toc-entry-col1 a {
font-weight: bold;
font-size: 14px;
}
.toc-header-col1,
.toc-header-col2,
.toc-header-col3 {
background:#9E9E9E;
}
.toc-header-col1 {
padding: 10px;
width: 250px;
}
.toc-header-col2 {
padding: 10px;
width: 75px;
}
.toc-header-col3 {
padding: 10px;
width: 125px;
}
.toc-header-col1 a:link,
.toc-header-col1 a:visited,
.toc-header-col2 a:link,
.toc-header-col2 a:visited,
.toc-header-col3 a:link,
.toc-header-col3 a:visited {
font-size: 13px;
text-decoration: none;
color: #fff;
font-weight: 700;
letter-spacing: 0.5px;
}
.toc-header-col1 a:hover,
.toc-header-col2 a:hover,
.toc-header-col3 a:hover {
text-decoration: none;
}
.toc-entry-col1,
.toc-entry-col2,
.toc-entry-col3 {
padding: 5px;
padding-left: 5px;
font-size: 12px;
}
.toc-entry-col1 a,
.toc-entry-col2 a,
.toc-entry-col3 a {
color: #666;
font-size: 13px;
text-decoration: none
}
.toc-entry-col1 a:hover,
.toc-entry-col2 a:hover,
.toc-entry-col3 a:hover {
text-decoration:underline;
}
#bp_toc table {
width: 100%;
margin: 0 auto;
counter-reset: rowNumber;
}
.toc-entry-col1 {
counter-increment: rowNumber;
}
#bp_toc table tr td.toc-entry-col1:first-child::before {
content: counter(rowNumber);
min-width: 1em;
min-height: 3em;
float: left;
border-right: 1px solid #fff;
text-align: center;
padding: 0px 11px 1px 6px;
margin-right: 15px;
}
td.toc-entry-col2 {
text-align: center;
} - Once everything is done, press Save Template button present at the very top of your screen.
- Now Simply create a new page where you want to display your sitemap. Go to Blogger >> Pages >> New page. In the Blogger page editor, select HTML tab and paste the following code in the HTML code editor:
<div id="bp_toc">
</div>
<script src='http://mybloggerlab.com/js/sitemap.js' type="text/javascript"></script>
<script src="/feeds/posts/summary?alt=json-in-script&max-results=9999&callback=loadtoc" type="text/javascript"></script> - After pasting the above code, you can write a title of your page. If you wish you can also disable comments because you would not like people posting comments on your sitemap. Once everything is done, press Publish button.
This is the cleanest good looking sitemap I've ever seen. Good job MyBloggerLab!
ReplyDeleteI am glad that you liked it.
DeleteCheers
Great info.
ReplyDeleteAll the best!
In instruction 1,u said . Go
ReplyDeleteto Blogger >> Template >> Edit HTML
>> Search for ]]> tag and
just above it paste the following
code.....Please can you illustrate with picture what you meant by JUST ABOVE IT..because i have tried but its bringing something ealse...
From Above I mean over.
Delete<--Here comes the code-->
]]></b:skin>
how to change the table header (i.e. post title, post date, labels)?
ReplyDeleteAnd why the sitemap doesn't show "NEW" in new post?
ReplyDeleteGreat Thanks! This has Worked on my website.
ReplyDeleteReally helpful, thanks a bunch!
ReplyDeleteHowever, my site contents don't appear on google despite submitting xml sitemap. Need your help on this
Hey boss I am your true fan and I want to ask that how to have the word editor like in this blog in which you have inserted code
ReplyDeleteHi admin how i create sitemap of categories ?
ReplyDeleteStay tuned, we will soon write a tutorial on it.
DeleteLove this one! Thank you. All others I've seen use labels instead of posts. I don't suppose though that there could be a way to list the blog posts, 'alphabetically'?
ReplyDeleteYou are actually giving too much credit to your site in this code.This site map will have to get the js from the source which is your site.This will make my site slower.Goodbye i will not use your code
ReplyDeleteHi,
ReplyDeleteJS links are not considered as backlinks in terms of SEO. Nor It will be going to slow down your site. If you want to use the JS codes you can simply paste it in your template the load time will be same before/after.
Thanks
great its work, thanks
ReplyDeletethank you and great job man
ReplyDeletethanks alot
ReplyDelete